Floor Pan Replacement
Well, This wasn't a week end project, more like all week! My floor was seriously eaten up with rust. At first I got a hood from a full size pick up truck at the body shop's dumpster to make some patch's to repair the floor. That wasn't working out too well, it was kickin' my butt. I needed to come up with another plan.
I bought my replacement pans from Melvin's. The choice was Front and Rear or Full Length, (Right Side and Left Side). I went with the Full Length route (both sides). I decided to replace the toe boards while I was at it. These panels are not exactly the same as original, the 'hump' that the seat (s) bolts to are not as crisp as Ford made them, but you can't tell it when carpet is installed, (and it's under the seat too). The best thing I can say about replacing the floor pans is DON'T CUT NOTHING until you get the new pan and see what will be staying in your car, and what will be leaving.
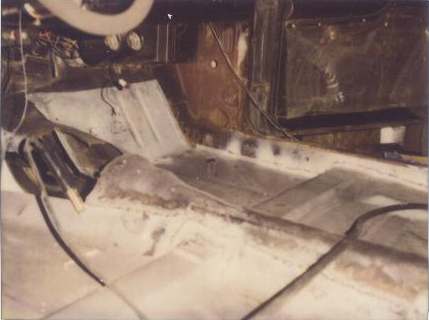
These replacements panels don't have the transmission tunnel, and the toe board doesn't have a lip around the side to weld against the rocker panel like the floor panels have. I tried to leave enough metal around the kick panel to weld to, but most of it fell off with the rest of the floor. I made a tab and welded it to the side and toe panel with some old sheet metal I had laying around. Measure where your dimmer switch is, speedometer cable, seat mounting holes, ect. to help you remember where to screw the stuff back down. Watch the rubber seal around the steering column and firewall, it burns when it gets hot. Taking the old floor out was easy on my car, all I had to do was peel it off with pliers. First, you know, you have to remove the seats and carpet and anything else on the floor. Then lay a panel over the old flooring and trace the edge and added about to the old floor so the new panel will overlap and have a place to weld to. I use a grinder to smooth over the spot welds on the frame rails and on the inside rocker panels. I replaced one side of the floor at a time, this will help keep the car square.
The seat support frames are easily to bend up while hanging out in the air. While replacing the toe board panels, the concave lines in the firewall/inner fender did not match up, I had to hammer/dolly the firewall to the toe board so I could have metal to metal to weld. I found out using pop rivets and small bolts to hold things in position and to the frame rails made things more easygoing. Then I MIG weld inside and underside. I kind of stitched the floor in, weld about a half inch, and skipped around to keep the panel from getting too hot in one place. After I skipped around all I could, I went back and filled in between the stitches. I made a continuous bead around the frame rails to make the 'frame' stronger. You might want to paint everything with POR-15 at this time. I use 3-M seam sealer on the seams, inside and underside.
The floor replacement panels don't have the big access or drain holes for the rubber plugs to mess with. I used a heavy roll asphalt building felt to cover the floor after I primed and painted. A few days later, after it aired out I then added the metal faced insulation then pad and carpet.