Maverick and Comet Repair
Maverick and Comet Brakes
REMOVAL, REPACKING AND INSTALLATION
Disc Brakes
- Raise the front of the car and support it with safety stands.
- Remove the front wheels.
NOTE: In order to remove the rotor, the caliper and anchor plate must be removed from the car. - Loosen, but do not remove, the upper anchor plate attaching bolt with a 3/4 in. socket.
- Using a 5/8 in. socket, remove the
lower anchor plate attaching bolt.
NOTE: When the caliper is removed from the car it must be wired out of the way of the rotor. Also, the brake pads will fall out of the caliper if they are not held in place when the caliper is removed. You will have to insert a small piece of wood or a folded piece of heavy cardboard between the shoes to hold them in place. Have a piece of wire and a piece of wood handy before you start the next step. - Hold the caliper in place and remove the upper anchor plate attaching bolt.
- Slide the caliper and anchor plate assembly off the rotor, inserting the block of wood between the brake pads as they become visible above the rotor.
- When the anchor plate is clear of the rotor, wire it out of the way.
- Remove the dust cap from the rotor hub by either prying it off with a screwdriver or pulling it off with a pair of channel-lock pliers.
- Remove the cotter pin and the nut lock from the spindle.
- Loosen the bearing adjusting nut until it is at the end of the spindle.
- Grasp the rotor with a rag and pull it outward, push it inward.
- Remove the adjusting nut and the outer bearing.
- Remove the rotor from the spindle.
- Place the rotor and tire on a clean, paper-covered surface with the wheel studs facing upward.
- Working through the hole in the center of the wheel hub, tap the
grease seal out of the rear of the hub with a screwdriver or drift.
NOTE: Be careful not to damage the inner bearing while knocking out the grease seal. - Remove the grease seal and bearing from under the rotor, and discard the grease seal.
- Clean the inner and outer bearings and the wheel hub with a suitable solvent. Remove all old grease.
- Thoroughly dry and wipe clean all components.
- Clean all old grease from the spindle on the car.
- Carefully check the bearings for any sign of scoring or other damage. If the roller bearings or bearing cages are damaged, the bearing and the corresponding bearing cup in the rotor hub must be replaced. The bearing cups must be driven out of the rotor hub to be removed. The outer bearing cup is driven out of the front of the rotor from the rear and vice versa for the inner bearing cup.
- Whether you are reinstalling the old bearings or installing new ones, the bearings must be packed with wheel bearing grease. To do this, place a glob of grease in your left palm, then, holding one of the bearings in your right hand, drag the edge of the bearing heavily through the grease. This must be done to work as much grease as possible through the roller bearings and cage. Turn the bearing and continue to pull it through the grease until the grease is packed between the bearings and the cage all the way around the circumference of the bearing. Repeat this operation until all of the bearings are packed with grease.
- Pack the inside of the rotor hub with a moderate amount of grease, between the bearing cups. Do not overload the hub with grease.
- Apply a small amount of grease to the spindle.
- Place the rotor, face down, on a protected surface and install the inner bearing.
- Coat the lip of a new grease seal with a small amount of grease and position it on the rotor.
- Place a block of wood on top of the grease seal and tap on the block with a hammer to install the seal. Turn the block of wood to different positions to seat it squarely in the hub.
- Position the rotor on the spindle.
- Install the outer bearing and washer on the spindle, inside the rotor hub.
- Install the bearing adjusting nut and tighten it to 17-25 ft. lbs. while spinning the rotor. This will seat the bearing.
- Back off the adjusting nut one half turn.
- Tighten the adjusting nut to 10-15 ft. lbs.
- Install the nut lock on the adjusting nut so two of the slots align with the hole in the spindle.
- Install a new cotter pin and bend the ends back so they will not interfere with the dust cap.
- Install the dust cap.
- Install the front tires if they were removed.
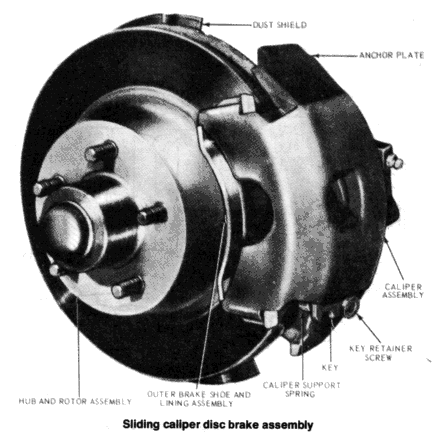
DISC BRAKES
Instead of the
traditional expanding brakes that press outward against a circular
drum, disc brake systems utilize a cast iron disc with brake pads
(linings or shoes). Braking effect is achieved in a manner similar
to the way that you would squeeze a spinning phonograph record
between your fingers. The disc (rotor) is a one-piece casting with
cooling fins between the two braking surfaces. This enables air to
circulate between the braking surfaces, making them less sensitive
to heat buildup and more resistant to fade. Dirt and water do not
affect braking action since such contaminants are thrown off by the
centrifugal action of the rotor or scraped off by the pads. Also,
the equal clamping action of the brake pads tends to ensure uniform,
straight line stops. All disc brakes are inherently self-adjusting.
Sliding caliper disc brakes are used at the front of many 1974 and later models. The name of this system is derived from the slide action of the brake caliper on the anchor plate during braking. The plate-like brake rotor is attached to and mounted on the car by the front wheel hub. A brake caliper anchor plate, attached to the front wheel spindle, mounts over the top of, but does not touch, the rotor. The caliper is mounted in the middle of the large opening in the anchor plate. When the brake pedal is depressed, and hydraulic force is generated, the piston in the caliper forces the inboard brake pad inward and into contact with the brake rotor. The caliper now begins to act like a C-clamp, with the inboard shoe and the piston acting as the adjustable screw. Since there is only a small amount of clearance between the brake pads and the rotor, the inboard shoe contacts the rotor almost as soon as the brake pedal is depressed. As the brake pedal is depressed further, it increases the amount of hydraulic pressure sent to the piston in the caliper. Since the inboard shoe is already in contact with the brake rotor, it cannot be moved. As the caliper pushes on the inboard brake shoe, the increased hydraulic pressure forces the back of the caliper housing away from the back of the piston. This causes the caliper to slide inward on the anchor plate and force the outboard brake pad into contact with the rotor. Thus the name sliding caliper. This happens very quickly, so both pads contact the rotor at about the same time.