Maverick and Comet Repair
Maverick and Comet Brakes
DISC CALIPER REMOVAL, OVERHAUL AND INSTALLATION
- Raise the vehicle and place jackstands underneath the lower control arms.
- Remove the wheel and tire assembly.
- Disconnect the flexible brake hose from the caliper.
To disconnect the hose, loosen the tube fitting which connects the
end of the hose to the brake tube at its bracket on the frame. Remove the horseshoe clip from the hose and bracket, disengage the hose, and plug the end. Then unscrew the entire hose assembly from the caliper. - Remove the key retaining screw from the caliper retaining key.
- Slide the retaining key and support spring either inward or outward from the anchor plate. To remove the key and spring, a hammer and drift may be used, taking care not to damage the key in the process.
- Lift the caliper assembly away from the anchor plate by pushing the caliper downward against the anchor plate and rotating the upper end upward out of the anchor plate.
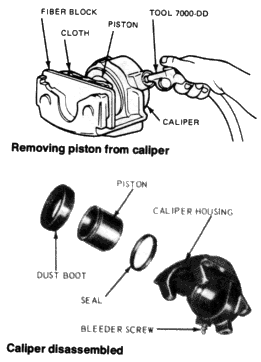
- Remove the piston by applying compressed air to the
fluid inlet port with a rubber-tipped nozzle. Place a towel or thick
cloth over the piston before applying air pressure to prevent damage
to the piston. If the piston is seized in the bore and cannot be
forced from the caliper, lightly tap around the outside of the
caliper while applying air pressure.
CAUTION: Do not attempt to catch the piston with your hand. - Remove the dust boot from the caliper assembly.
- Remove the piston seal from the cylinder and discard it.
- Clean all metal parts with isopropyl alcohol or a suitable non-petroleum solvent and dry them with compressed air. Be sure there is no foreign material in the bore or component parts. Inspect the piston and bore for excessive wear or damage. Replace the piston if it is pitted, scored, or if the chrome plating is wearing off.
- Lubricate all new rubber parts in brake fluid. Install the piston seal in the cylinder groove, being careful not to twist it. Install the dust boot by setting the flange squarely in the outer groove of the bore.
- Coat the piston with brake fluid and install it in the bore. Work the dust boot around the outside of the piston, making sure that the boot lip is seated in the piston groove.
- Install the caliper as outlined in Steps 12-18 in the sliding caliper "Disc Pad Removal and Installation" procedure.
- Thread the flexible brake hose and
gasket onto the caliper fitting. Torque the fitting to 12-20 ft.
lbs. Place the upper end of
the flexible brake hose in its bracket and install the horseshoe clip. Remove the plug from the brake tube and connect the tube to
the hose. Torque the tube fitting nut to 10-15 ft. lbs. - Bleed the brake system as outlined in the "Brake Bleeding" section.
- Check the fluid level in the master cylinder and fill as necessary. Install the reservoir cover. Depress the brake pedal several times to properly seat the caliper and shoes. Check for leakage around the caliper and the flexible brake hose.
- Install the wheel and tire assembly and torque the nuts to 70-115 ft. lbs. Install the wheel cover.
- Lower the car. Make sure that you obtain a firm brake pedal and then road-test the car for proper brake operation.
Hub and Disc Assembly
REMOVAL AND INSTALLATION
- Raise the front of the vehicle and install jack stands beneath the lower control arms.
- Remove the wheel and tire assembly.
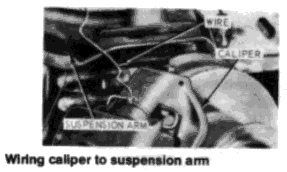
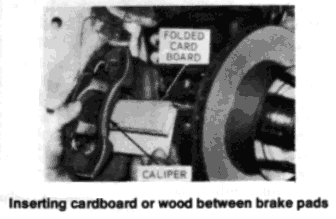
- Remove the caliper from its mount as described under Steps 3-6 of "Disc Caliper Removal, Overhaul and Installation." Wire the caliper out of the way to the upper control arm, taking care not to twist or damage the flexible brake hose. Do not remove the anchor plate. Insert folded cardboard or wood between the brake pads to keep the piston seated.
- Remove the grease cap from the hub. Remove the cotter pin, nut lock, and adjusting nut from the spindle.
- Remove the outer wheel
bearing and flat washer from the hub by first pulling the hub and
disc assembly out far enough to loosen the bearing, then pushing it
back in and removing the bearing and washer. Slide the hub and disc
assembly off the spindle.
NOTE: If a new disc is being installed, remove the protective coating with carburetor degreaser, and pack a new set of wheel bearings with wheel bearing grease. If the original disc is being installed, make
sure that the grease in the hub is clean and adequate. Also make sure that the inner bearing and grease retainer are lubricated and in good condition, and that the disc braking surfaces are clean. - Slide the hub and disc assembly onto the spindle. Install the outer wheel bearing and flat washer and adjusting nut on the spindle. Tighten the adjusting nut finger tight, so that the hub and rotor may spin freely.Inspect the disc (rotor) for scoring or corrosion. Minor scores or rust spots may be removed with a fine emery cloth. If the braking area is excessively scored or rusted, the disc must be replaced. Check the disc for warpage (run-out). Tighten the wheel bearing adjustment nut so that the end-play is taken up. Make sure that the disc can still be rotated. Then, hand-spin the disc and check for wobbling or an out-of-round condition. Minor run-out may be corrected by machining. Maximum allowable run-out is 0.003 in. Readjust the wheel bearing to specifications.
- Install the caliper to its mount as described under Steps 12-18 of "Disc Pad Removal and Installation."
- Install the wheel and tire assembly.
- Adjust the wheel bearing as outlined under "Wheel Bearing Adjustment."
- Remove the jack stands, lower the car, and tighten the wheel lug nuts to 70-115 ft. lbs.
- Apply the brakes several times to properly position the brake pads. Road test the car for proper brake operation
PARKING BRAKE
ADJUSTMENT
- Make sure that the parking brake is fully released.
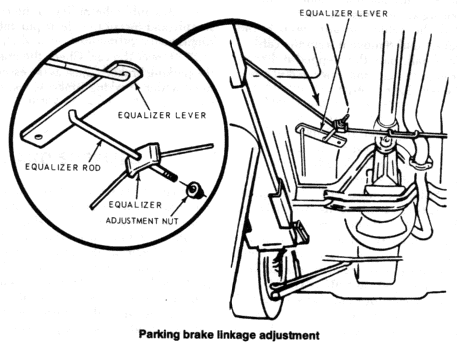
- Place the transmission in Neutral. If it is necessary to raise the car to obtain access to the cable adjusting point, raise the car on an axle-type hoist so as not to off-load the suspension and stretch the brake cables.
- Tighten the adjusting nut against the cable equalizer until a drag is felt when a rear wheel is turned by hand. Then, loosen the adjusting nut until the rear brakes are fully released. There must be no brake drag, or premature lining wear and possible brake fade from heat buildup may result. Tighten the locknut, if so equipped, to 7-10 ft. lbs.
- If the vehicle was raised, lower it and test the operation of the brake on a grade.
REMOVAL AND INSTALLATION
- Remove the hairpin clip and clevis pin securing the cable pulley to the control handle assembly and remove the pulley.
- Disengage the locking pawl and slide the control rod forward. Remove the cable ball from the slot in the control rod.
- Remove the hairpin retainer from the dash panel bracket and disengage the cable from its bracket.
- Pull the cable and insulator tube down through the hole in the dash panel. Remove the insulator tube from the cable.
- Raise the car on a hoist. If a hoist is not available, a floor jack may be used, but jack stands must be placed beneath the lower control arms and rear axle housing.
- Remove the retaining screw and clip from the cable on the chassis side rail.
- Disengage the cable stepped rod from the equalizer lever.
- Remove the hairpin retainer from the cable housing at the crossmember.
- Pull the cable forward through the crossmember and remove it from the car.
- To install, pass the stepped rod rearward through the crossmember and connect it into the equalizer lever.
- Install the hairpin retainer on the cable housing at the crossmember.
- Install the cable housing retainer clip on the cable and install the retainer screw on the chassis side rail.
- Install the insulator tube onto the upper end of the cable, and push the cable and insulator up through the hole in the dash panel.
- Engage the upper end of the cable housing in the dash panel bracket, and install the hairpin retainer.
- Connect the cable ball to the control rod.
- Assemble the pulley to the control assembly and install the clevis pin and hairpin retainer.
- Lower the car. Check the operation of the parking brake. Adjust as necessary as outlined under "Parking Brake Adjustment."