Maverick and Comet Repair
Chassis Electrical
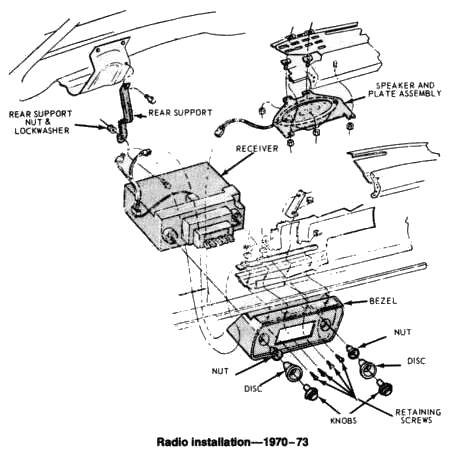
RADIO
REMOVAL AND INSTALLATION
- Disconnect the battery negative cable
- Remove radio rear support nut and lockwasher.
- Remove the four radio-to-instrument panel retaining screws.
- Pull the radio from the instrument panel and disconnect the antenna, speaker, and power leads.
- Remove the radio.
- Remove the knob and disc assemblies from the radio shafts.
- Remove the two bezel retaining nuts and remove the bezel.
- To install the radio, position the bezel :n the radio and install the two bezel retaining nuts.
- Install the disc and knob assemblies on the radio shafts.
- Connect the antenna, speaker, and power connectors.
- Position the radio so that the rear support mounting bolt enters the hole in the rear support mounting bracket.
- Install the four radio-to-instrument panel retaining screws.
- Install the radio rear support nut and lockwasher.
- Place the speaker and the power wire harnesses in the clip on the bezel.
- Connect the battery and check the operation of the radio.
- Adjust the selector buttons for desired stations.
WINDSHIELD WIPERS Motor
REMOVAL AND INSTALLATION
- Remove the instrument cluster.
- If air conditioned, remove the center connector and duct assembly. Remove the mounting bracket screw behind the center duct, disconnect the assembly from the plenum chamber and left duct, and pull the center connector and duct assembly out through the cluster opening.
- Working through the cluster opening, disconnect the two pivot shaft links from the motor drive arm by removing the connecting clip.
- Disconnect the wiring plug at the motor, remove the three retaining bolts, and remove the motor through the cluster opening.
- To install the motor, bolt the motor to the mounting plate with the three retaining bolts.
- Connect the right pivot shaft link to the motor and then connect the left pivot shaft link. Lock the clip as shown in the illustration.
- On air conditioned vehicles, insert the end of the center connector and duct assembly near the mounting bracket into the left duct and the opposite end into the plenum chamber.
- Secure the assembly with the mounting bracket screw.
- Install the instrument cluster, and check operation of the wiper motor.
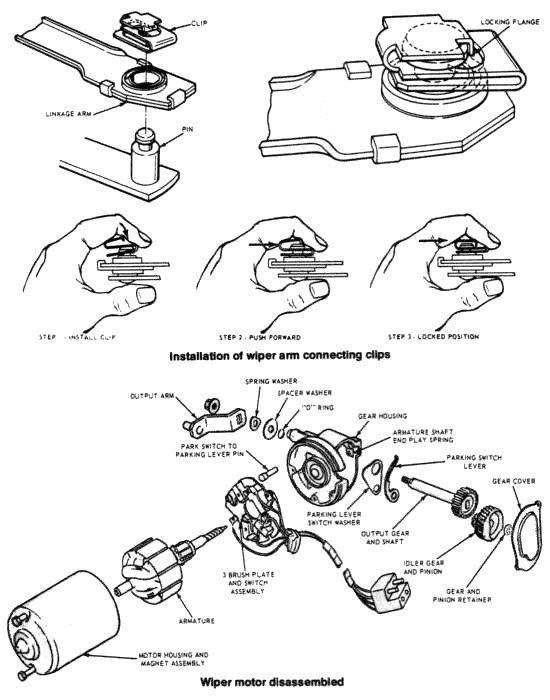
Pivot Shaft And Linkage
REMOVAL AND INSTALLATION
Left Side
- Remove the instrument cluster.
- Remove the wiper arm and blade assembly from the pivot shaft.
- Working through the cluster opening, disconnect both pivot shaft links from the motor drive arm by removing the connecting clip.
- Remove the three bolts that retain the left pivot shaft assembly to the cowl and take the left pivot shaft assembly out through the cluster opening.
- Before installing, cement a new gasket on the pivot shaft mounting flange. Tighten the retaining bolts to 3-7 ft. lbs. After installing the pivot shaft and link assembly to the cowl, connect the right pivot shaft link to the motor drive arm first, and then connect the left link. Be sure that the connecting clip is locked as shown in the illustration.
Right Side
- Disconnect the battery negative cable.
- Remove the wiper arm and blade assembly from the pivot shaft.
- If the car is air conditioned, remove the right duct assembly. Unclip the duct from the right connector, slide the left end out of the plenum chamber, and lower the duct assembly out from under the instrument panel.
- From under the instrument panel, disconnect first the left and then the right pivot shaft link from the motor drive arm by removing the remaining clip.
- Reaching between the utility shelf (1970-73 only) and the instrument panel, remove the three bolts that retain the right pivot shaft and link assembly to the cowl. Lower the assembly out from under the instrument panel.
- Before installing, cement a new gasket to the pivot shaft mounting flange. After installing the pivot shaft and link assembly to the cowl, be sure that the right pivot shaft link is connected to the motor drive arm before the left pivot shaft link. Be sure that the connecting clip is in the locked position as shown in the illustration.
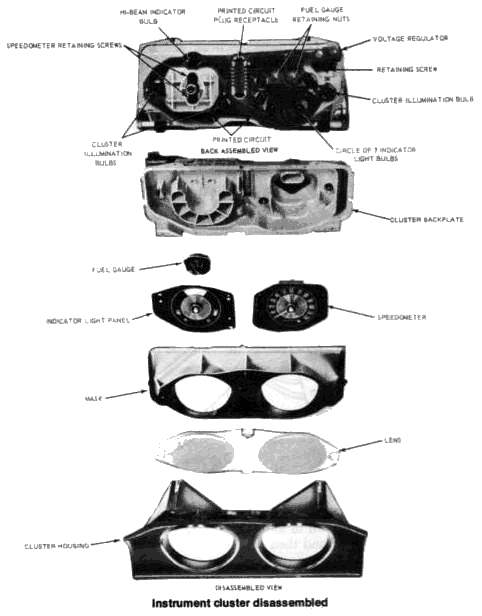
INSTRUMENT CLUSTER
Removal and Installation
- Disconnect the battery negative cable.
- From under the instrument panel, disconnect the speedometer cable by pressing the flat surface of the plastic connector and pulling the cable away from the head.
- Remove the two retaining screws at the top of the cluster and swing the cluster down from the panel.
- Disconnect the multiple connector plug from the printed circuit at the back of the cluster.
- Remove the cluster by tilting it out at the top and disengaging the brackets on the cluster lower edge from the slots in the panel.
- Reverse the above procedure to install.
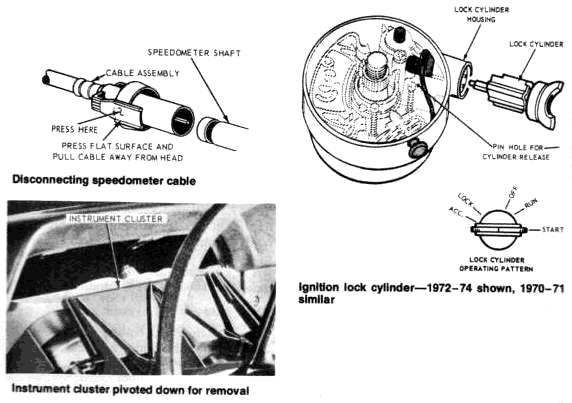
Ignition Lock Cylinder
REMOVAL AND INSTALLATION
- Disconnect the negative battery cable.
- On cars with a fixed steering column, remove the steering wheel trim pad and the steering wheel. Insert a stiff wire into the hole located in the lock cylinder housing.
- Place the gearshift lever in Reverse on standard shift cars and in Park on cars with automatic transmission, and turn the ignition key to the ON or RUN position.
- Depress wire and remove the lock cylinder and wire.
- Insert the new cylinder into the housing and turn to the OFF position. This will lock the cylinder into position.
- Reinstall the steering wheel and pad.
- Connect the negative battery cable.