Maverick and Comet Repair
Fuel System
Motorcraft Variable
Venturi 2700W
For 1977, Ford's new 2700W (Variable Venturi) carburetor is
available on California cars equipped with the 302 V8. Since the
design of this carburetor differs considerably from the other
carburetors in the Ford lineup, a little theory might be helpful
here.
In exterior appearance, the variable venturi
carburetor is similar to conventional carburetors, and like a
conventional carburetor, it uses a normal float and fuel bowl
system. However, the similarity ends there. In place of a normal
choke plate and fixed area venturis, the 2700W carburetor has a pair
of small oblong castings in the top of the upper carburetor body
where you would normally expect to see the choke plate. These
castings slide back and forth across the top of the carburetor in
response to fuel/air demands. Their movement is controlled by a
spring loaded diaphragm valve regulated by a vacuum signal taken
below the Venturis in the throttle bores. As the throttle is opened,
the strength of the vacuum signal increases, opening the Venturis
and allowing more air to enter the carburetor. Fuel is admitted into
the venturi area by means of tapered metering rods that fit into the
main jets. These rods are attached to the Venturis, and, as the
venturis open or close in response to air demand, the fuel needed to
maintain the proper mixture increases or decreases as the metering
rods slide in the jets. In comparison to a conventional carburetor
with fixed Venturis and a variable air supply, this system provides
much more precise control of the fuel/air supply during all modes of
operation. Because of the variable venturi principle, there are
fewer fuel metering systems and fuel passages. The only auxiliary
fuel metering systems required are an idle trim, accelerator pump
(similar to a conventional carburetor), starting enrichment, and
cold running enrichment.
NOTE: Adjustment, assembly and
disassembly of this carburetor require a number of special tools
which are available only from your Ford dealer. Do not attempt to
adjust or rebuild the carburetor without first purchasing the
special tools.
ADJUSTMENTS
Before making any adjustments with the engine running, set the
parking brake and block the wheels. Make sure the engine is at
normal operating temperature and that any power accessories are
turned off. Adjust the curb idle speed as you would on a
conventional carburetor. Check the emission control decal under the
hood for the proper speed.
|
Year
|
Fuel Float
Level Adjustment
(in.. ± 1/32
in.) |
Fast Idle Cam
Index Setting
(in. ± 1/64
in.)
|
Anti-stall
Dashpot
Adjustment
(in.± 1/64
in.)
|
Choke Plate
Pull-down
Clearance
Adjustment
(in. ± 0.0100 in.)
|
Dechoke
Clearance
Adjustment
(minimum
in.)
|
Automatic Choke
Thermostatic
Spring Housing
Adjustment
|
|
1970
|
170 eng-7/32
200 eng-3/8 |
|
7/64 |
170 engs-0.225
200 engs-0.265
|
170 eng-0.28
200 eng-0.25
|
170 man trans-1-Rich
170 auto trans-Index
all 200 eng-Index
|
|
1971
|
3/8 |
170 man trans--0.105
200 man trans--0.170
200 auto trans--0.140
|
without A/C
0.100 |
170 man trans--0.200
200 man trans--0.230
200 auto trans--0.200
|
170 eng-0.28
200 eng-0.25
|
Index
|
|
1972
|
3/8 |
170 man trans--0.105
200 man trans--0.170
200 auto trans--0.140
|
without A/C
0.100 |
170 man trans--0.170
200 man trans--0.230
200 auto trans--0.200
|
170 eng-0.28
200 eng-0.25
|
170 man trans--Index
200 man trans--Index
200 auto trans--1-Rich
|
|
1973
|
3/8 |
200 man trans--0.170
200 auto trans--0.140
|
without A/C
0.100 |
200 man trans--0.230
200 auto trans--0.200
|
0.25
|
200 man trans--Index
200 auto trans--1-Rich
|
|
1974
|
3/8 |
200 man trans--0.170
200 auto trans--0.140
|
without A/C
0.100 |
200 man trans--0.230
200 auto trans--0.200
|
0.25
|
Index
|
|
1970
|
9/16
|
0.115
|
without A/C
7/32
|
0.19
|
0.25
|
1-Rich
|
|
1971-72
|
9/16
|
0.115
|
None
|
0.19
|
0.25
|
1-Rich
|
|
1973
|
9/16
|
0.115
|
None
|
0.19
|
0.25
|
Index
|
|
1974
|
9/16
|
0.115
|
None
|
man trans--0.30
auto trans--0.19
|
0.25
|
Index ♠
|
|
1975
|
3/8 ♣
|
0.140
|
None
|
0.290
|
0.25
|
200 eng--Index
250 eng--2 Rich
|
|
1976-77
|
25/32
|
0.140
|
None
|
200 eng-0.260
250 eng-0.290 ♥
|
|
200 49 states--1 Rich
250 49
states--Index
250 California--2 Rich
|
|
Autolite (Motorcraft) 2100D-V2
|
| Year |
Fuel Level
(inches)
|
Float
Adj.
(inches) |
Fast Idle Cam
Index Setting
(inches)
|
Anti-stall
Dashpot
Adjustment
(inches)
|
Accelerator Pump
Operating Rod
Position
(in overtraval
lever)
|
Automatic Choke
Thermostatic
Spring Housing
Adjustment
|
Choke Plate
Pull-down
Clearance
Adjustment
(in. ±
0.0100 in.)
|
|
1971
|
7/16
|
13/16
|
man trans--0.150
auto
tr style="TEXT-ALIGN: left"ans--0.130
|
without A/C
auto trans-1/8
|
man trans--#3 hole
auto
trans--#2 hole
|
man - 1 Rich
auto - Index
|
man trans - 0.170
auto
trans - 0.150
|
|
1972
|
7/16
|
13/16
|
.0130
|
without A/C
auto trans-1/8
|
#2A hole
|
1 - Rich
|
man trans - 0.140
auto
trans - 0.150
|
|
1973
|
7/16
|
13/16
|
See Procedure
|
None
|
#2A hole
|
3 - Rich
|
|
|
1974
|
7/16
|
13/16
|
See Procedure
|
None
|
#2A hole
|
3 - Rich
|
0.160 ♦
|
|
1975
|
7/16
|
13/16
|
See Procedure
|
None
|
#2 hole
|
3 - Rich
|
0.140
|
|
1976-77
|
7/16
|
13/16
|
See Procedure
|
None
|
#2 hole
|
3 - Rich
|
0.140
|
♠ Choke cap setting on carburetor
D4DE--AAA is 1 lean
♣ Float level in 3/4 in on D5DE--NB
carburetor
♥ Pull-down clearance is 0.230 in. on D6DE--BB
carburetor
♦ Overrich choke setting -increase clearance
in steps of 0.020 in
Lean choke
settings-decrease clearance in steps of 0.020 in.
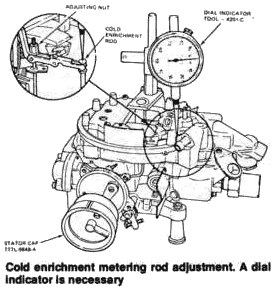
COLD ENRICHMENT METERING ROD
NOTE: This procedure
requires special tools.
- Remove the choke cap.
- Install the stator cap (Tool T77L-9848-A) as a weight to
seat the cold enrichment rod.
- Install a dial indicator
or equivalent with the tip on the top surface of the
enrichment rod and adjust the dial to zero. Raise the weight
slightly and release to make sure the zero repeats.
- Remove the stator cap and reinstall it at the index
position, the dial indicator should read to specification.
If the rod height is not to specification turn the adjusting
nut clockwise to increase or counterclockwise to decrease
height.
- Reinstall the choke cap at the specified
setting
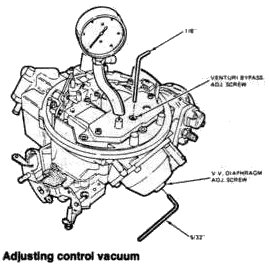
CONTROL VACUUM
- Install a tachometer.
- Start the
engine and set the idle to specification.
- Using an
alien wrench turn the venturi valve diaphragm adjusting
screw clockwise until the valve is firmly closed.
- Connect a vacuum gauge to the vacuum tap on the venturi
valve cover.
- With the engine at curb idle, use an allen wrench to turn the venturi bypass adjusting screw to
reach the specified vacuum setting.
NOTE: It may be
necessary to reset the idle speed while making the
adjustment.
- Turn the venturi valve diaphragm
adjusting screw counterclockwise until the vacuum drops to
the specified setting.
NOTE: It is necessary to cycle
the throttle during this adjustment to get the vacuum to
drop.
- Check and/or reset the curb idle.
FAST IDLE SPEED
With the engine idling, EGR disconnected
and the vacuum line plugged, make sure the fast idle lever
is on the specified step of the fast idle cam. Turn the fast
idle adjusting screw clockwise to increase speed and
counterclockwise to decrease speed.

FUEL LEVEL ADJUSTMENT
Remove the carburetor upper body.
Remove the old gasket and install a new one. Fabricate a
gauge to the specified dimension. Check the chart for this.
Turn the upper body upside down and
place the fuel level gauge on the cast surface, not on the
gasket. Measure the vertical distance from the cast surface
of the upper body to the bottom of the float. If it needs
adjustment, bend the float operating lever away from the
fuel inlet needle to decrease the setting and toward the
needle to increase the setting.
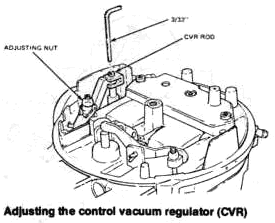
CONTROL VACUUM REGULATOR (CVR)
ADJUSTMENT
NOTE: The cold enrichment
metering rod adjustment must be checked and/or set before
making this adjustment.
- Rotate the choke cap 180
degrees clockwise (rich) from index and cycle the throttle
to set the fast idle speed cam.
- Press lightly on the
CVR rod. If there is any down travel, the rod is not seated
and must be adjusted. If there is no down travel, turn the
adjusting screw counterclockwise until there is some down
travel and proceed with the adjustment.
- Turn the CVR
rod clockwise until the adjusting nut just begins to rise.
- Again, press lightly on the CVR rod...if any spring-back
can be seen the rod is not fully seated. Turn the adjusting
screw clockwise in 1/4 turn increments until no spring- back
can be seen.
- Reset the choke cap to the specified
setting.
|